How to Build a Restream Server
You don't NEED Restream.io to multistream. Try building it yourself for less!
Lately, I’ve been hearing a lot of talk about giving up on the Twitch Affiliate program and multistreaming to YouTube Gaming, Twitch, Facebook Gaming, or any other streaming platform you like for increased exposure to your content. I’m not going to get into the pros and cons of this approach in this article but will instead focus on how to multistream if you’re interested in doing so. More specifically, the cheapest way I’ve found to do it without overloading your upload connection to your internet provider. This should work with most streaming software but I’ll refer to OBS (Open Broadcaster Software) here.
If you’re only here to find out how to build your own restream server then you can jump ahead to here.
First, what is multistreaming?
If you’re not familiar with multistreaming, it essentially duplicates your live stream to multiple sites instead of the standard setup of sending it to one. The options for doing this vary based on where the duplication occurs.
- The easiest option: Stream to another web service that will duplicate it
- The free option: Have your PC duplicate the stream locally
- The DIY option: Build your own web server that will duplicate it I’ll go over each option but first, it’s important to understand what an RTMP server is. Some computer on the internet has to receive your encoded stream so it can be displayed to your viewers and RTMP is just an agreement between your PC and the receiver on how to send this information. This article isn’t a deep dive into the RTMP protocol but if you’d like to learn more about it you can start here.
The easiest option
Send your stream to another web service that will duplicate it
Restream.io hosts an RTMP server that will accept your stream and then forward it to any number of other RTMP servers you like, whether that’s Twitch, Facebook, YouTube, or some other platform. At the time of writing this article, it supports over 30 streaming providers and is by far the easiest option with some of the best features I’ve seen. However, if you don’t want their logo showing up on your streams or would like to stream to more than 2 channels you'll have to pay $16/mo.
The free option
Have your PC duplicate the stream locally
You should expect to pay for services that add a lot of value like Restream but anyone on a budget that only needs basic multistreaming capabilities will probably be looking for a free alternative like multi-rtmp. It’s an OBS plugin that hosts your own RTMP server on your PC that handles the broadcasting instead of Restream.io. This is an awesome option but has a pretty big problem. Your internet connection will probably struggle with it because the broadcasting is all happening on your local network. For example, if you’re using it to stream to 3 different platforms, then you are uploading 3 versions of your stream. That means for a standard 720p60fps stream getting multistreamed to 3 platforms, you’re uploading 4,500kbps x 3 = 13,500kbps (13.5mbps). Keep this in mind and run a speed test to see how that number compares against the upload speed you’re getting from your ISP.
The DIY option
Build your own web server that will duplicate it
So what can you do if you don’t want to pay $16/mo on restream and don’t have enough upload speed to use the multi-rtmp OBS plugin? Host your own RTMP server in the cloud! You can do this with a service called Linode that lets you run servers on their platform for a monthly fee.
Fortunately, it doesn’t take much computing power to forward a stream to multiple destinations so you can do this for $5/mo with their cheapest option. This option also has a 1GB upload speed allowing for up to 650GB uploaded each month which should get you around 80 hours of streaming to 3 platforms. Here’s how to set it up after sigining up for a Linode account:
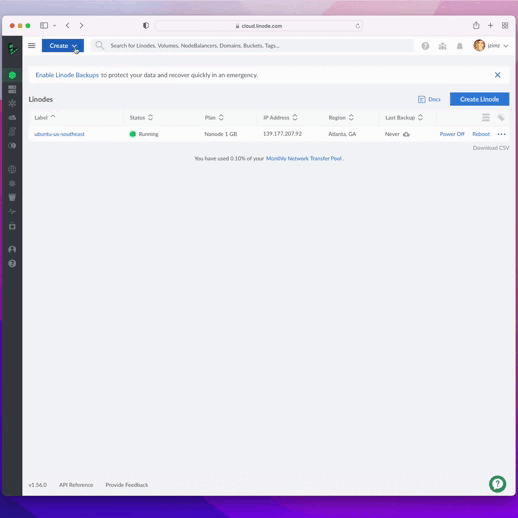
Create a Linode server
- Create a new Linode server
- Choose an operating system. I recommend the latest version of Ubuntu
- Choose the Region closest to you
- Choose a Linode Plan. The cheapest Nanode 1 GB plan is enough for what we’re doing
- Choose a password
- Click “Create Linode”
Setup the stream forwarding service (NGINX)
Once it’s done you just need to install and set up NGINX which will run your RTMP service. Linode has a great step-by-step article on how to do this but essentially you just need to:
- Launch the LISH Console for your new Linode
- Install the NGNIX server, RTMP service, and other dependencies
sudo apt install build-essential libpcre3 libpcre3-dev libssl-dev nginx-full libnginx-mod-rtmp ffmpeg
- Configure RTMP by editing the NGINX configuration file
vim /etc/nginx/nginx.conf
- Paste this RTMP configuration into the NGINX configuration file and update it with your desired forwarding destinations. You can add a "push" line for each service you would like to forward the stream to. Note, Facebook Gaming streams need some extra configuration to work which I’ll address later.
rtmp {
  server {
    listen 1935;

    application live {
      live on;

      # Twitch -- For for a list of ingest URLs see,
      # https://stream.twitch.tv/ingests/
      #rtmp://atl.contribute.live-video.net/app/{YOUR-STREAM-KEY}

      # YouTube
      #push rtmp://a.rtmp.youtube.com/live2/{YOUR-STREAM-KEY}

      # Facebook -- Stunnel must be configured for this to work! I also
      # recommend using a persistent stream key if you're setting this up so
      # you don't need to update the server configuration with every stream.
      #push rtmp://127.0.0.1:19350/rtmp/{YOUR-STREAM-KEY}
    }
  }
}
- Startup your server! You’ll need to run this command any time you make changes to the configuration file for them to get picked up.
systemctl restart nginx.service && systemctl status nginx.service
Stream!
Now all you need to do is stream to your new RTMP server and it will handle the rest. Just grab the IP address of your Linode instance and put it into OBS under Settings > Stream
- Service: Custom
- Server: rtmp://{{YOUR-LINODE-IP}}/live
- Stream Key: Makeup anything you want. Just don't share it with anyone.
I recommend leaving all "push" lines commented out at first so you can test your server before going live. After starting the server and going live in your streaming software you can open a network stream (File > Open Network) in VLC and enter the stream URL (Ex. http://{your-linode-server-ip}/live/{YOUR-STREM-KEY}). If everything is working you should see your stream in VLC!
How to forward to Facebook Gaming
That should be all you need to get started. However, there are a couple of extra things you may need to know depending on where you stream. Facebook gaming requires that streams be sent using rtmps which isn’t supported by default in NGINX. Because of this, you’ll need to do some extra steps to get things working with Facebook.
Add support for rtmps with stunnel
- Install stunnel. This service will be used to accept an rtmp stream and forward it to an rtmps destination.
sudo apt-get install stunnel4
- Create an stunnel configuration for forwarding to Facebook
vim /etc/stunnel/conf.d/fb.conf
- Paste in the following configuration
[fb-live]
client = yes
accept = 127.0.0.1:19350
connect = live-api-s.facebook.com:443
verifyChain = no
- Update the stunnel configuration
vim /etc/default/stunnel4
- Enable the stunnel service and include the new Facebook configuration file
ENABLE=1
FILES="/etc/stunnel/*.conf"
- Update the RTMP configuration
vim /etc/nginx/nginx.conf
- Add a new "push" line to forward to stunnel. When the stream comes into your Linode server, NGINX will forward it to your stunnel service over rtmp which will then send it to Facebook over rtmps.
push rtmp://127.0.0.1:19350/rtmp/{YOUR-STREAM-KEY}
- Restart nginx and stunnel so your changes take effect. The status commands aren't required but will let you know if the service ran into any issues starting up.
systemctl restart stunnel4 && systemctl restart nginx.service && systemctl status stunnel4 && systemctl status nginx.service
What about transcoding?
You can also do transcoding with this solution. You’ll just need to install ffmpeg and use the exec_push directive instead of push. However, this will increase the CPU load on the server so you may need to increase the size of the server to get it working. You can find some examples of transcoding on the nginx-rtmp-module GitHub page if you’re interested.